Random Rotations
Generate a colorful grid of randomly rotated squares
Preview
In this tutorial, we'll create a variation of the following image:

Before continuing, please ensure you have Xylo properly installed as per the instructions in the Quickstart.
Defining the Grid
Let's begin by laying out a collection of squares on a grid. We can accomplish this by defining a grid_size value and then using a nested for loop to place each square.
This will draw a grid of white squares on a black background. However, each square will be incredibly small and in the center of the image; we'll fix this later.
First, let's explain what's currently happening in the code. The program will start by calling grid, which then collects the results of rows, transforming its list of shapes into a single composite shape.
In rows, we iterate over the range of 0..grid_size, which in this case is 0..10. Since this is an exclusive range, it starts at 0 and ends at 9. These numbers are assigned to an i function which is then passed into cols. We also need to use collect here because cols returns a list of shapes.
In cols, we again iterate over the grid size, this time assigning the values to j each iteration. After defining each square, we use ss to scale both the x and y axes by 0.375 and t to translate them to the coordinates (i, j).
However, if you run the code, the squares will hardly be visible. This is because we need to scale them to fit the image size. Let's modify the grid function:
Here, we are using the builtin function width, which returns the width of the generated image as an int type. In the CLI, you specify this with the --width option.
When we use collect rows, it allows us to treat the entire grid of squares as a single shape. Currently, the shape has the dimensions 10x10 because we are generating 10 squares per row/column and placing them 1 pixel apart from each other.
We want the grid to take up the entire width of the image, so we scale the grid by the width divided by the grid size. For example, if the width is 400 pixels and the grid size is 10, the grid will be scaled by 40. We need to convert the width to a float first since both width and grid_size return int types, which could cause problems with integer division.
Let's generate an image and see what happens:

Well... it's a start. Looks like the grid is being scaled correctly, at least. But why is it not in the right position?
In Xylo, the coordinate system starts with (0, 0) in the center of the image. This means that in a 400x400 image, the bottom left corner is at (-200, -200) and the top right corner is at (200, 200).
Since we are using (i, j) to determine the squares' coordinates in the cols function, when i and j are both 0 it will place the square in the center of the image.
Fixing this is quite simple, though. We'll just need to translate the grid to the bottom left corner:
Now the entire grid will be translated by half the width leftwards and half the height downwards. It is important to translate after it is scaled, otherwise it will multiply the translated coordinates.
Let's generate another image and take a look:

Alright, it's an improvement. We can see all of the squares now. But we want the grid to be centered in the image and it seems to be offset.
This is because the position of a square determines where its center is located. In the earlier image we generated, the first square was centered on (0, 0). Now, assuming the image is 400x400, the square will be centered on (-200, -200).
How do we fix this? Well, we can go back to the cols function and change how the squares are placed:
By offsetting i and j by 0.5, the first square, prior to the scaling and translation of the grid, will be the size 0.75x0.75 and placed at (0.5, 0.5). After scaling by 40 and translating (-200, -200), the center of the square would be placed at (-180, -180) and the dimensions would be 30x30, leaving a 5 pixel padding on each side.
Let's see what this outputs:

Great! Now that we have our grid, we can continue onward to the next step.
Rotating and Coloring the Squares
In order to create unique variations in the visual layout, let's randomly rotate each square.
We can do this with the following code:
In the cols function, we've made a change where, after scaling, the square is rotated by rand * 360 using the r function.
rand is a function that returns a random float in the half-open range [0, 1). Since r takes in an angle in degrees, we want to multiply this value by 360 in order to generate a random number from [0, 360).
Let's see what this outputs by running generate a couple times:


Sweet! As you can see, each time the program is ran it rotates the squares differently, and the pattern has a very interesting visual effect.
We can make this even better, though. Let's modify the cols function to give each square a random color:
Here, we are using the hsl function to define the hue, saturation, and value of each square.
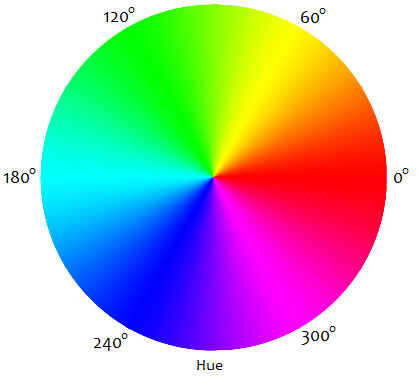
For saturation and value, we're defining them as a fixed 50% and 60% respectively for visual consistency. For the hue, we are selecting a random degree from 0 to 360 on the color wheel. Here's a diagram of how degrees correspond to color:
With these changes, let's run the program again:


Awesome! It's really coming along now. Kind of looks like confetti.
There's one part of this image that's still a bit visually unappealing, though, and that would be the fixed black background.
To improve this, we can go back to our root function and change it so that it also selects a random color:
Here, we're doing the same as we did for the squares, but this time we're using 40% saturation and 20% lightness. This is to contrast the light color of the squares with a darker background.
Let's run this a few times:


Perfect. We now have all the ideal building blocks of a procedural art piece implemented: near-infinite variations, visual appeal, and stylistic consistency.
What's left now is to play around with the configured values. For example, let's see what happens when we increase the grid size from 10 to 50:

Whoa! That looks pretty interesting!
Final Result
This is the final version of the code we created:
It really didn't take that much to create something so visually interesting, did it? That's the power of Xylo's expressive syntax at play!
So, what's next?
Well, you could try different modifications. There are many features of Xylo that were not covered in this tutorial: gradients, strokes, skews, paths, weighted randomness, recursion, etc.
Try different shapes. Randomize the grid size. Arrange the shapes in different patterns. Draw shapes on top of each other. Use different color variations. Mix and match different ideas together to create something uniquely your own.
That'll conclude this tutorial. If you enjoyed, be sure to leave a star in the GitHub repository and share it on social media. See you in the next one!
Last updated